
Contact Groups
Segmenting stakeholders into lists will help provide a more relevant, tailored stakeholder experience. It is an easy way to identify, prioritise and understand who you are engaging with. Contact Groups are used in a tree-like structure and can be defined by a variety of attributes, including location, demographics, industry and or the interests of them. To capture information as accurately as possible, stakeholders can be assigned multiple Contact Groups.
To create a Contact Group;
- Click on the + Add New Contact Group button
- Input the Contact Group Name
- Select the Contact Group Parent from the dropdown. Note: By not selecting any Parent, this will create the Parent Contact Group
- Click Save
To edit a Contact Group;
- Select the Contact Group to edit
- Click on the pencil icon next to the Contact Group name which will allow you to edit
- Update the details
- Click Save
To merge a Contact Group;
- Select the Contact Group to merge
- Click on the merge icon in the the top right hand corner
- Select the relevant Contact Group from the list to merge into (this will become the new Contact Group name)
- Click Merge
To delete a Contact Group;
- Select the Contact Group to delete
- Click on the trash can icon Note: If any, the sub groups and stakeholder need to be deleted before the Parent can be deleted
- You will be asked to confirm your decision, to proceed, select 'Yes' or to cancel select 'No'
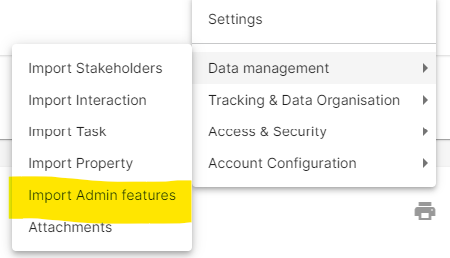
To import a Contact Group;
- Go to Setting > Data Management > Import admin features
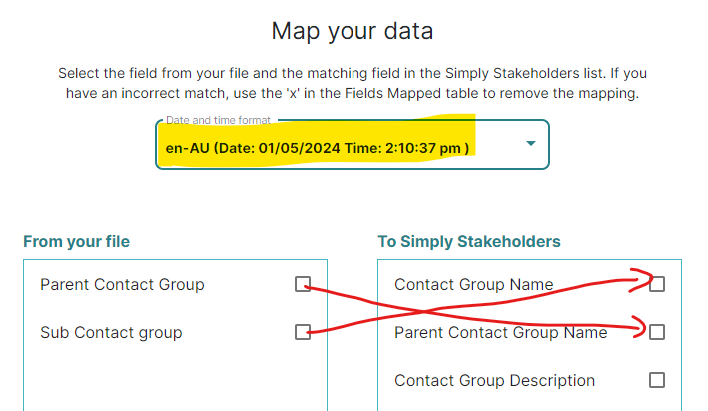
- Upload your .xlxs file with two columns for your Parent and your Child Contact groups and click next; then map your columns for the contact group names, making sure you set your date and time format to your region:
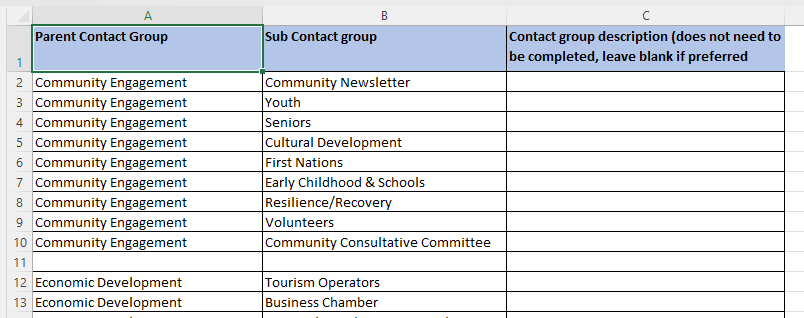
You also need to ensure that your spreadsheet has the parent contact group name in each row, see example: - You will be taken to a Validate your results page to confirm the data import, if it looks correct, select 'Import' or to fix errors and reupload your spreadsheet, select 'Back' or 'Cancel'.
To share a Contact Group across projects;
- Select the Contact Group you want to share (this saves you from manually adding the group to each project)
- Use the drop down to select from either 'Share contract group name' or 'Share contract group and stakeholders' if you do NOT want all stakeholders shared across projects as default select "Share contact group name" Note: by default it will be set to 'Do not Share'
- Use the next drop down to select from either 'Only share to selected projects and not future projects' or 'Share to all selected and future projects within this project group'
- Based on your selections, use the list of Contact Groups to select the Contact Group(s) you want to share to
NOTE: If the Parent Contact Group is shared across all projects then putting a Child Contact Group in and selecting Share will automatically share to the same projects. This can save time if you have many Contact Groups and/or projects - you can create the Parent Group/s and then bulk import the Child Contact Groups, automatically applying to the same projects as the Parent.